
Designing the inside

Measuring has been completed. As a reminder, this van is built on a Dodge Caravan platform. It is a classic minivan with no rear seats with remaining details like cup holders in the molded sides and slots where seatbelts would have gone. This model came in a variety of forms, many with solid panels where we have windows. We were definitely looking for one that was more minivan-like than cargo van. Dennis really wanted operating rear windows for ventilation.  There is a metal platform that has been screwed over the dips and unevenness of the van floor. The floor is covered in a something similar to contact paper.  It is pretty scratched up so it will have to go. One of the cool things that this van has are storage hatches in the floor. Storage is everything and we will want to be able to access these spaces.  

So with a pen, paper and a measuring tape, I measured everything. One of the trickiest issues this van brings is the floor is on a 4.5 degree angle. This angle will need to be accounted for in design of the platform if we want the bed to be flat.

Once I had the measurements finished, I created a digital drawing on my iPad Pro using an app called Graphic. This allowed me to duplicate the measurement layer and play with different possibilities. And there are a lot of possibilities. Just when I think I nailed it.... I didn’t. Creating a design that allows us to access the rear hatch area is tricky especially when you want to fit a refrigerator drawer or electric cooler as well.
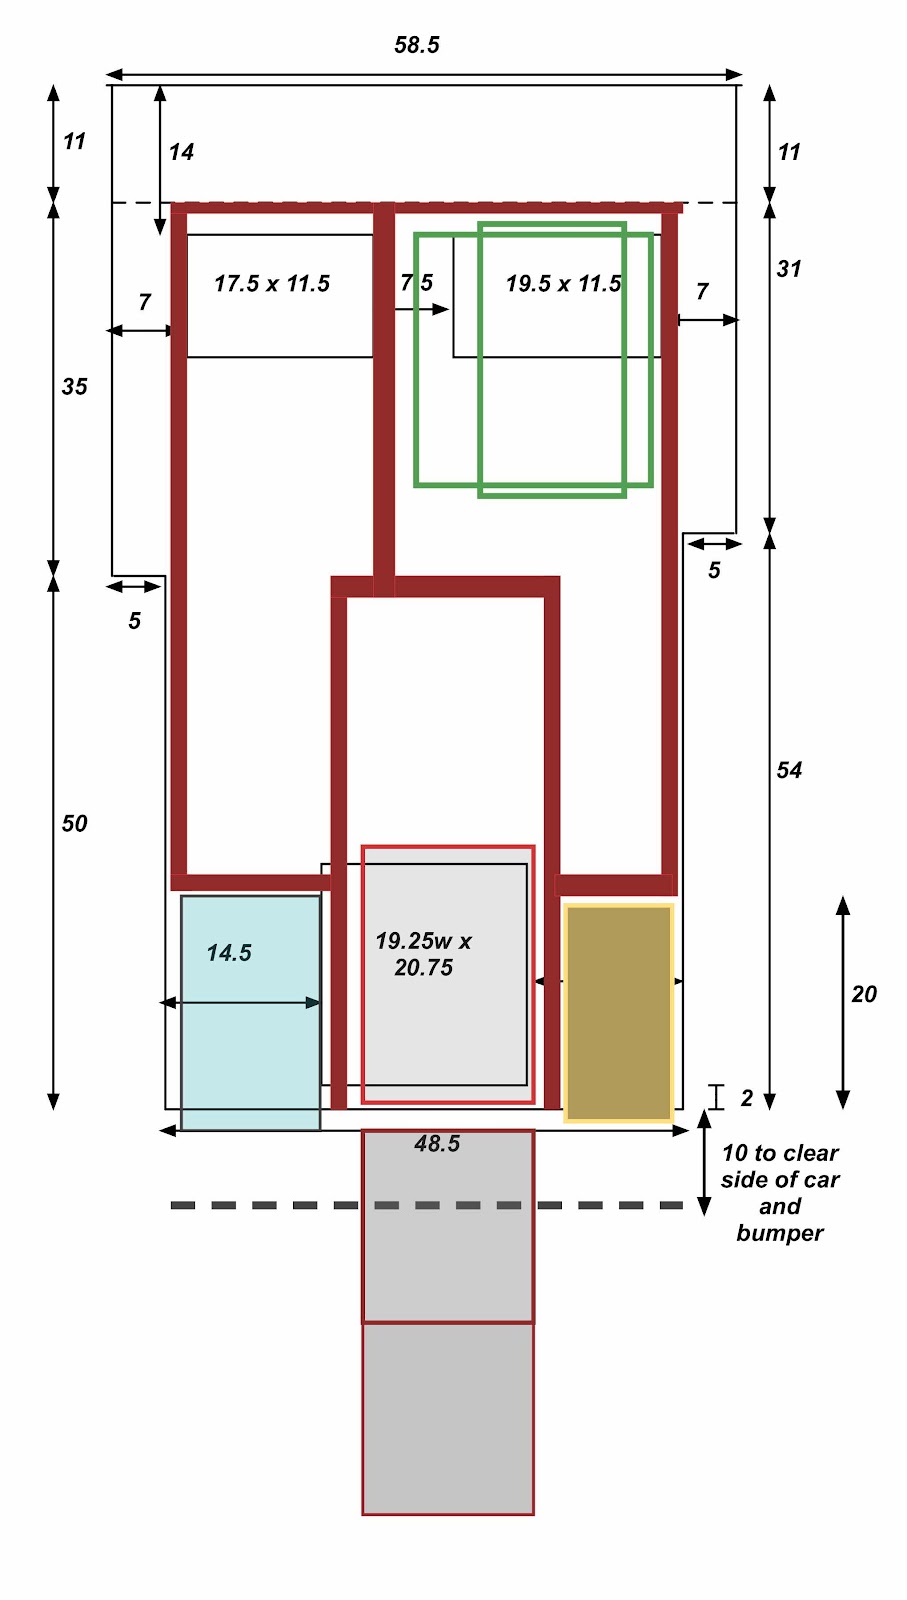
Speaking of equipment, let’s talk about the equipment and features we would like to have....
  • An electric cooler or fridge drawer
  • An electrical system and source
  • A sink with electric pump faucet
  • A pullout kitchen surface
  • Storage space for chairs and a table.
  • A Pee-Pee Teepee setup
  • Easy access to dry goods

So lots of drawings, edits and compromises are in the future to make this fit.

Comments

Popular posts from this blog

Gualala Point Campground

Armed with warm clothing and our new Carsule, Dennis and I were ready for another adventure. Dennis’s coworker, Cheryl, recommended  Gualala Point Campground  (part of Sonoma County Regional Parks). Dennis found a spot available for Friday and Saturday night. Gualala Point is next to Sea Ranch on the Pacific Coast off of Hwy 1. Figuring it will be about a 3.5 hour drive, we scooted out the driveway about 1pm.  Sunset is about 4:30pm and we are trying not to setup in complete darkness. We stopped at a bakery on the way up for some cookies and then continued to our spot. The campground is located right before you cross the bridge into Gualala. It is tucked back in the redwoods next to the Gualala River. The sites are close together but situated in a way that you don’t feel you are on top of your neighbor. A ranger came over shortly after our arrival to give us the lowdown on the facilities...the host is on vacay, firewood is self serve and our campground pass gives us free ...

Final design and the packages start to arrive....

We finalized the design. Our original plan was to install a built in fridge drawer but we found an electric cooler the will just fit in our tight space. We ordered a  36L KUPPET portable cooler.  Because we need the mattress to be as long as possible, the cooler can’t be too deep.  This model doesn’t have handles that extend from the sides and that makes it fit in a tighter space. It is capable of freezing temperatures but does not have zones so ice cubes are likely not in our future.  The cooler will be run off of an battery power bank/generator called the  Eco Flow Delta 1300 Portable Power Station.  Because of the size of our van and the fact that the main accessory we are running is the cooler, we felt we did not need a larger more complicated power system.  The size is small but it packs a lot of power. Living in Northern California, rolling power outages during fire season has become common. It’s nice to know we could use it in a pinch ...

Let’s build an internal structure

So it is time to start building. There as been a lot of discussing and planning and at some point you just got to build and problem solve along the way. This is our official pandemic project and Dennis definitely needs a project. He has pretty much finished every home improvement project we had. Dennis is a really good woodworker and with a a chop saw, our neighbor’s table saw and a pocket hole jig we are ready to start.  We started with the outside structure.  Each framing side has to take into account the 4.5 degree angle of the floor.  The two sides are braced together near the front seats. With these three sides in place it is time to scrape off all of the contact paper.  Now we have a very shiny floor!  Next the framing for the pull out elements needed to be built.  There are two pullouts.  The first pullout is on a 48” full extension. This is part serves two purposes.  The first it is a hatch to access the storage area below. The second will...